Bearspaw Community Association · Staff How-To
Markets Operations Guide
Everything you need to run the Fall Harvest Market and the Christmas Market — where enquiries arrive, how to add vendors, how to assign booths, and how to chase payments. Keep this page handy.
The two markets
We run two markets each year:
- Fall Harvest Market — Oct 22–25, 2026. Vendor applications close Aug 15. Held across the Gym and Banquet Hall.
- Christmas Market — Nov 26–29, 2026. Vendor applications close Aug 31. Held across the Gym and Banquet Hall.
Both markets are managed from the same place in the portal. A vendor can apply to one market, the other, or both. Booths are tracked per market — a booth can be assigned to a different vendor for Fall vs Christmas.
Where enquiries arrive
Vendor enquiries come in through the website and land in the portal. Here's where to look:
- Vendor application forms (website): the public Fall and Christmas market pages each have a vendor application form. When someone submits it, a MarketVendor record is created with status Submitted.
- Vendor Interest page: general enquiries (not tied to a specific market) come in via the Vendor Interest form.
- In the portal: go to Office Portal → Market Management. Vendors appear in the Vendors list, where you can filter by market and by status (Submitted, Under Review, Approved, Confirmed, etc.).
Tip: check the Vendors list at least a couple of times a week during application season so nothing sits unanswered.
Adding a new vendor
Most vendors add themselves through the website form. If you need to add one manually (e.g. a phone enquiry), do it from the portal:
- 1Office Portal → Market Management → Vendors. Open the Vendors tab.
- 2Click Add Vendor and fill in their business name, contact name, email, industry, and which market(s) they're applying for.
- 3Set their status to Submitted (or Approved if you've already confirmed them).
- 4If they need to pay a booth fee, they'll pay through the website checkout, or you can record a payment manually (see Chasing payments below).
- 5Once approved, assign them a booth (see next section).
Vendor statuses — what they mean
Each vendor moves through a status pipeline. Keep this moving:
- Draft — started but not submitted. Usually means a form was abandoned.
- Submitted — enquiry/application received. Review their details.
- Under Review — you're checking their fit, products, and any past history.
- Approved — accepted. Ready to be assigned a booth and to pay.
- Not Approved — declined. Send a polite note.
- Waitlist — good fit but no booth right now.
- Confirmed — paid and booth assigned. They're in.
- Cancelled — pulled out.
Assigning booths
Booths are assigned by dragging a vendor onto a booth on the floor plan.
- 1Office Portal → Market Management → Floor Plan.
- 2Pick the market (Fall or Christmas) at the top — the plan updates per market.
- 3Pick the area (Gymnasium or Banquet Hall).
- 4On the right, you'll see Unassigned Vendors. Drag a vendor onto an open booth to assign them.
- 5To move or release a vendor, drag them off the booth back onto the vendor list.
Notes: a vendor can only go on a booth for their market. Corner/end-cap booths show an amber marker. The booth capacity is 88 total (Gym + Banquet).
Floor plans
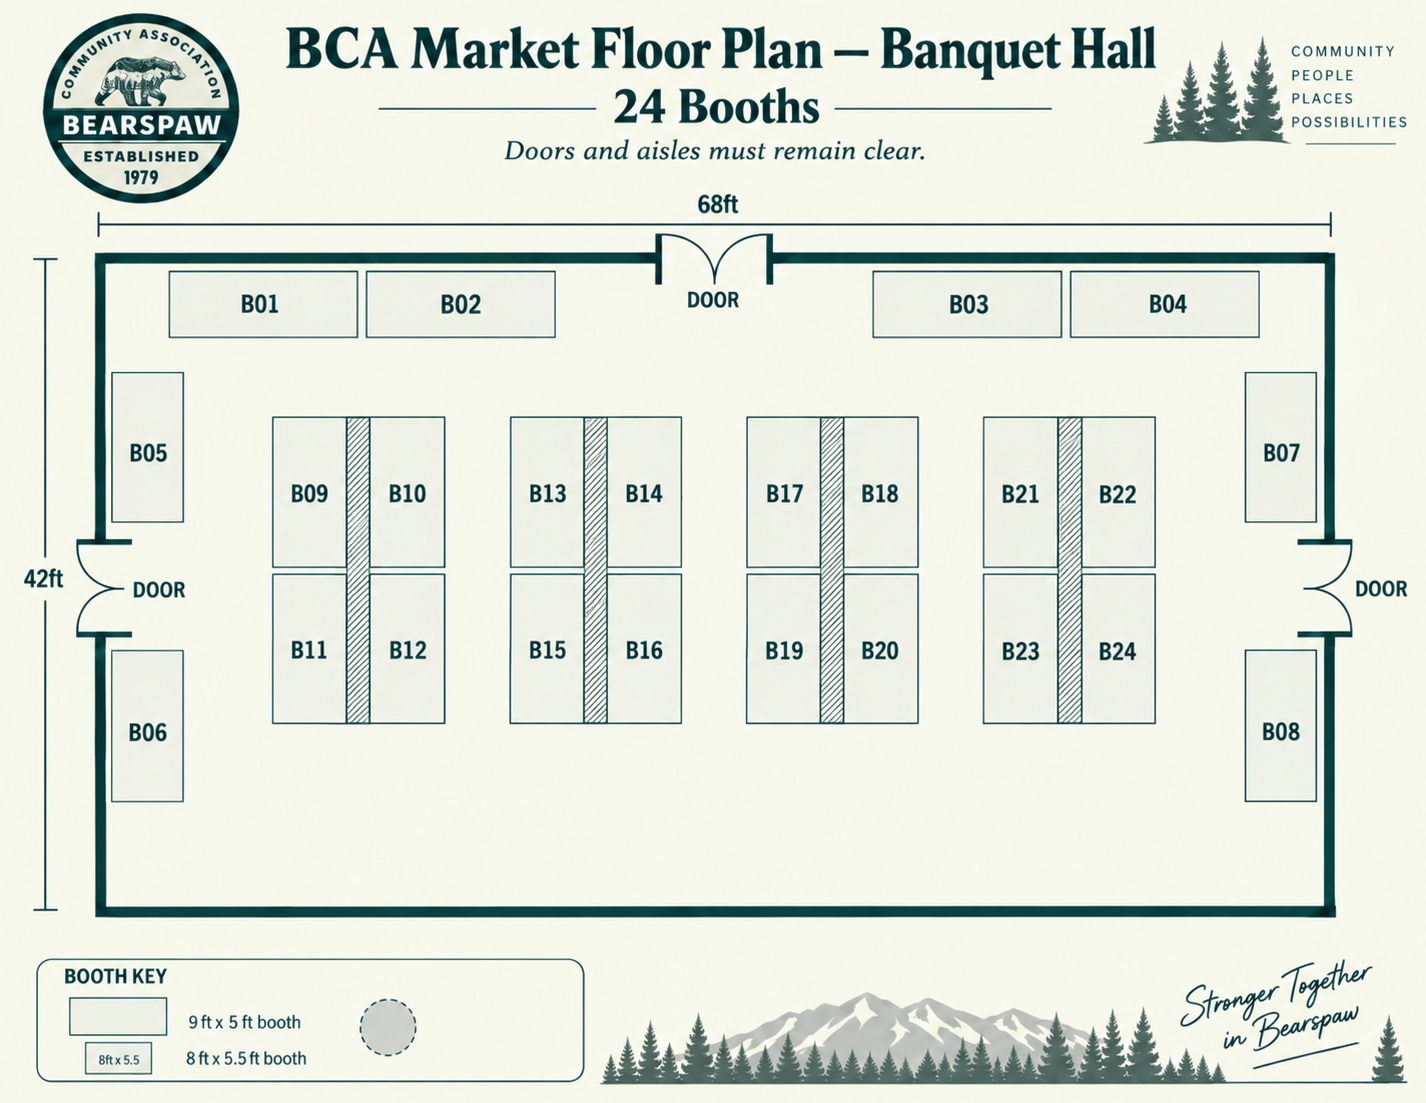
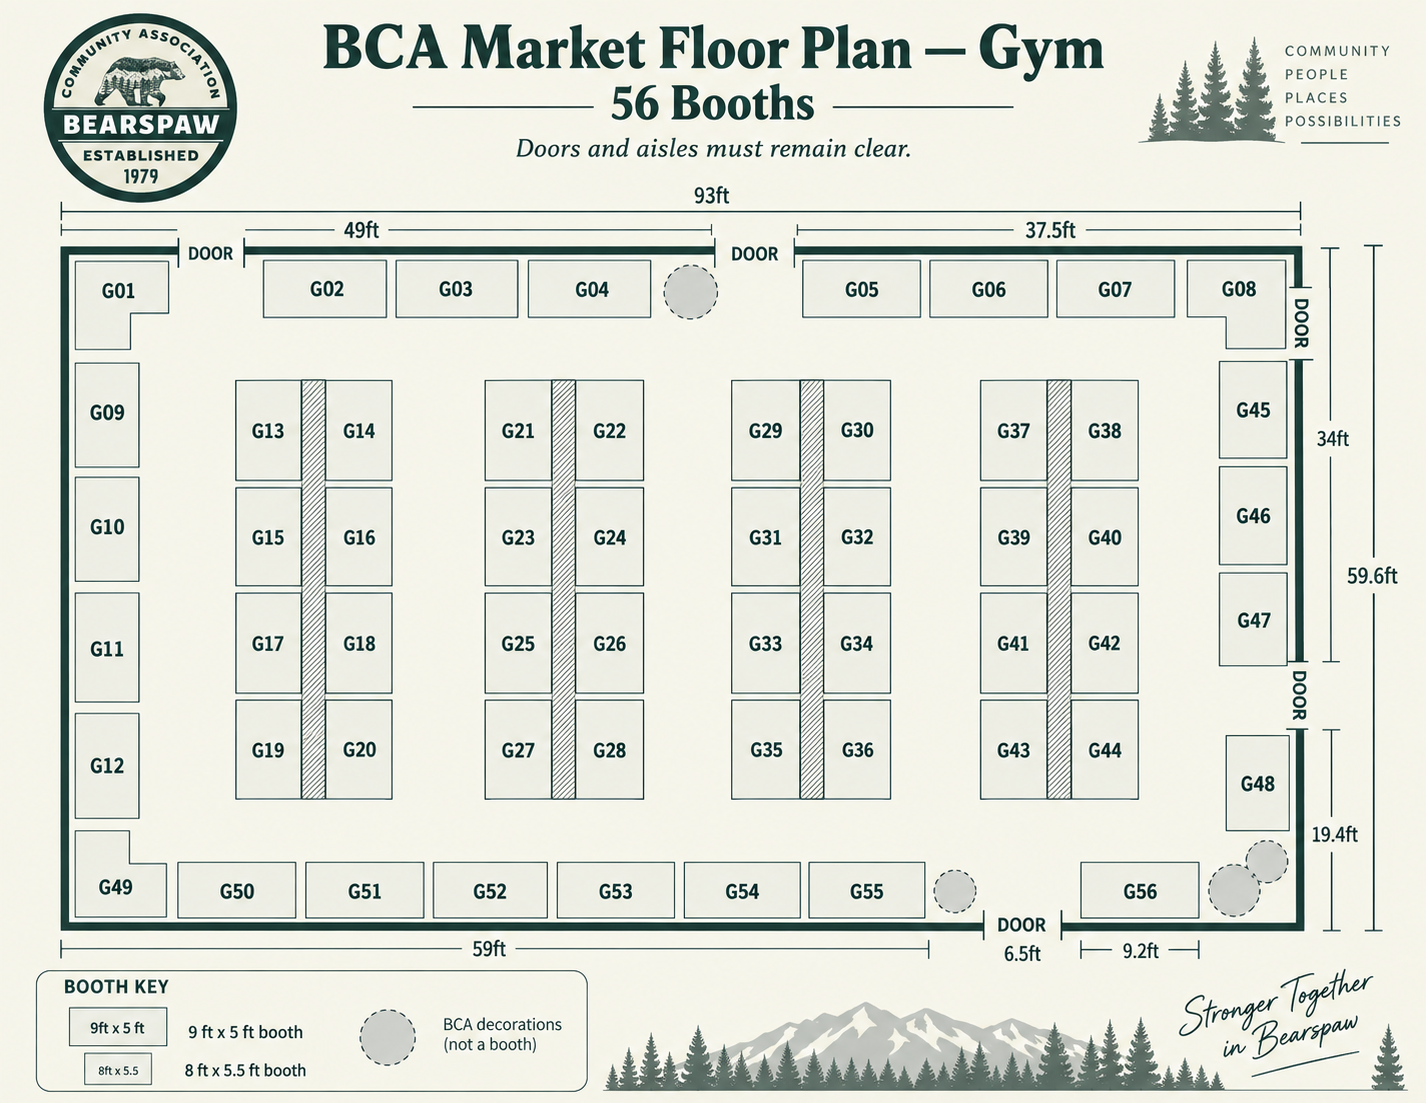
These are the official floor plans — doors and aisles must remain clear. Banquet Hall holds 24 booths; the Gym holds 56.
Chasing payments
Vendor booth fees are tracked per vendor. Here's how to stay on top of who owes what:
- 1Office Portal → Market Management → Payments (or the Vendors tab, payment column). You'll see each vendor's payment status: Unpaid, Deposit Paid, Paid in Full, Refunded, or Comp.
- 2Filter to Unpaid to see who still owes. Most pay online through the website at the time they apply; a few pay by cheque or cash.
- 3To follow up, use the Send Payment Reminder action on the vendor — it emails them a polite reminder with their balance.
- 4When a cheque or cash arrives, mark them Paid in Full (or Deposit Paid) and record the amount and method so the books stay clean.
- 5A vendor should be Confirmed (paid + booth assigned) before the market opens.
If a payment doesn't seem to have come through the website, check with Jody (finance@bearspawlc.org) before marking it paid.
Helpful links
Quick links you'll use often:
- Office Portal — Market Management (vendors, floor plan, payments)
- Fall Harvest Market (public page)
- Christmas Market (public page)
- Vendor Interest form
- Staff Portal (clock in/out, your schedule)
Stuck on something? Message Emma at 825-431-1377 — happy to walk through anything.
Bearspaw Community Association · Stronger Together in Bearspaw